Your alternator is one of the most critical components in your vehicle’s electrical system. It charges your battery and powers essential electronics while your engine runs. If your headlights are dimming or your car won’t start reliably, the problem might not be your battery—it could be a failing alternator.
In this detailed guide, you’ll learn how to test an alternator using simple tools, understand common failure symptoms, and know when it’s time to replace this vital component.
Why Alternator Testing Matters
The alternator keeps your car’s electrical system running and your battery charged. If it fails, your vehicle may:
- Stall while driving
- Struggle to start
- Drain the battery completely
- Cause warning lights to appear on the dashboard
Testing your alternator helps you avoid breakdowns, costly repairs, and misdiagnosing battery-related problems.
Signs of a Bad Alternator
Before diving into how to test your alternator, know the warning signs. These can help you spot issues early:
- Dimming or flickering headlights
- Battery warning light on the dashboard
- Electrical accessories behaving erratically (e.g., radio, power windows)
- Whining or grinding noises from the engine bay
- Dead battery even after recent replacement
- Frequent stalling or hard starts
💡 Tip: A weak or dead battery doesn’t always mean your battery is bad—it may not be charging properly because of a failing alternator.
Safety Precautions Before Testing
When working with your vehicle’s electrical system, safety comes first. Follow these precautions:
- Park the vehicle on a level surface with the engine off
- Wear safety gloves and eye protection
- Keep metal tools away from battery terminals
- If needed, disconnect the negative battery terminal before inspecting wires
Tools You Need to Test an Alternator
You don’t need a full mechanic’s toolbox to get started. Here’s what you’ll need:
- Digital multimeter (essential for voltage testing)
- Safety gloves
- Optional: OBD-II scanner, load tester, flashlight, hand tools (wrench, screwdriver)
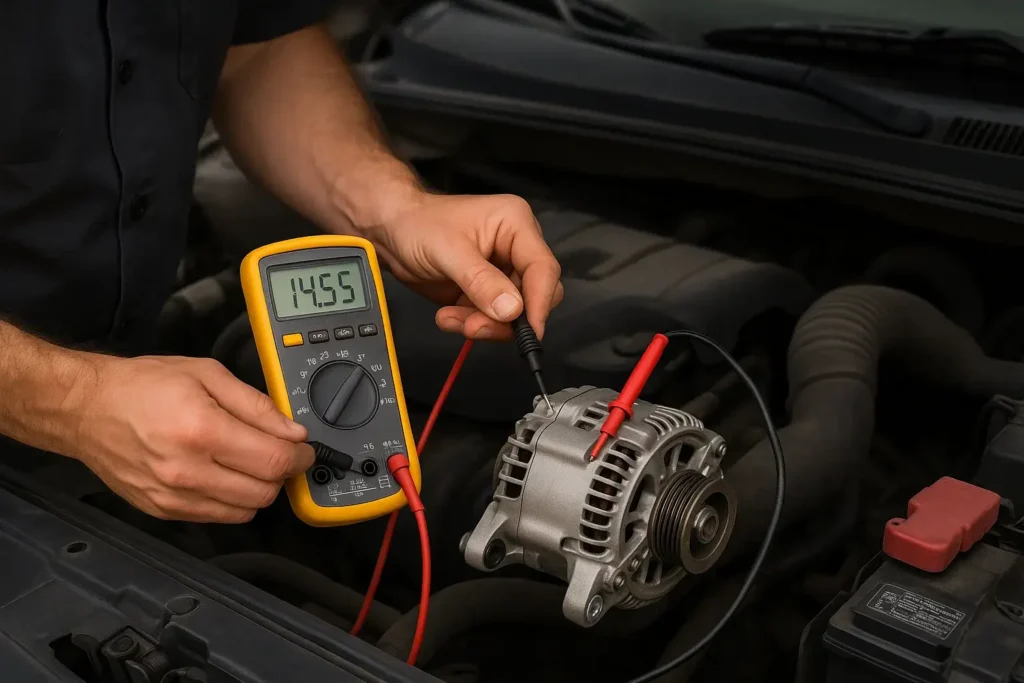
Method 1: How to Test an Alternator with a Multimeter
This is the most reliable and beginner-friendly way to test your alternator.
Step-by-Step Instructions:
- Set your multimeter to DC voltage, 20V range.
- With the engine off, connect the multimeter leads to the battery terminals:
- Red to positive (+), black to negative (–)
- Your battery should read between 12.4V and 12.7V if fully charged
- Red to positive (+), black to negative (–)
- Start the engine and check the voltage again:
- A healthy alternator should increase voltage to 13.8V–14.5V
- A healthy alternator should increase voltage to 13.8V–14.5V
- Turn on electrical accessories (headlights, AC, radio)
- Voltage should remain above 13V
- Voltage should remain above 13V
- Rev the engine to ~2,000 RPM and observe:
- Voltage should hold steady in the 13.8–14.5V range
- Voltage should hold steady in the 13.8–14.5V range
Voltage Reading Guide:
| Voltage Reading | What It Means |
|---|---|
| Below 12.5V (engine off) | Battery needs charging or is weak |
| 13.8–14.5V (engine on) | Alternator is charging properly |
| Below 13V (engine on) | Alternator may be failing |
| Over 15V (engine on) | Voltage regulator issue |
Method 2: Visual Inspection of the Alternator and Belt
If your voltage readings seem fine but you still suspect a problem, perform a visual inspection.
Check For:
- Loose or worn serpentine belt
- Corroded, frayed, or loose alternator wires
- Unusual noises (whining, grinding)
- Burnt smell near alternator = overheating
Belt Tension Test:
- Press down on the belt midway between pulleys
- It should move no more than ½ inch
- If too loose, it may not spin the alternator properly
Method 3: Load Testing (Advanced or Professional)
For a more comprehensive diagnosis, a load tester simulates real-world demand.
Using a Load Tester:
- Connect the tool to battery and alternator as instructed
- Start the engine
- The tester will simulate a heavy load and measure how the alternator responds
- A healthy alternator should maintain voltage under load
🛠️ This method is more accurate but requires specialized tools—ideal for advanced DIYers or professional shops.
Method 4: Dashboard Clues and Battery Light Behavior
Don’t underestimate your dashboard warning lights. They can give you useful early warnings.
- Battery light on during driving? Likely alternator issue
- Battery light on briefly at startup? Normal
- Flickering light when turning on accessories? Weak alternator output
Can You Test an Alternator Without a Multimeter?
It’s possible but not as accurate or recommended.
Quick Field Tests (Older Vehicles Only):
- Disconnect battery while engine is running
- If the engine dies, the alternator is bad
- ⚠️ Dangerous for modern cars – can fry your electronics!
- If the engine dies, the alternator is bad
- Observe light dimming when turning on accessories
- May suggest weak alternator
- May suggest weak alternator
These are only rough indicators and not reliable for newer vehicles.
What to Do If Your Alternator Fails the Test
If your alternator isn’t charging properly, don’t ignore it.
Your Options:
- Replace the alternator (common lifespan: 100,000–150,000 miles)
- Repair or rebuild if cost-effective (less common today)
Typical Replacement Cost:
- $300–$700 including labor
- More for luxury or high-tech vehicles
Temporary Fix:
- Jump-start and drive to a repair shop
- Turn off all unnecessary electronics to conserve battery power
Interesting read: How Much an Alternator Replacement Costs
Preventive Tips to Keep Your Alternator Healthy
- Inspect belt tension and wear every 10,000 miles
- Clean terminals and check for corrosion
- Avoid overloading your electrical system with aftermarket accessories
- Replace worn-out batteries promptly—they strain your alternator
Final Thoughts
Testing your alternator is one of the smartest DIY diagnostic steps you can take. With a simple multimeter test, you can avoid misdiagnosing battery problems and prevent unexpected breakdowns.
Whether you’re preparing for a road trip or just troubleshooting electrical issues, knowing how to test your alternator saves you time, money, and stress.
FAQs
Can I test my alternator at home?
Yes, you can. With a multimeter and a few simple steps, anyone can check if the alternator is charging the battery correctly.
How do I use a multimeter to test an alternator?
Set the multimeter to DC voltage. Start your car and touch the probes to the battery terminals. A healthy alternator should show 13.8 to 14.8 volts.
What voltage means the alternator is bad?
If the reading is below 13.5 volts or over 15 volts while the engine is running, the alternator may be failing.
Can I test the alternator without any tools?
Sort of. You can try turning on lights, AC, and radio while the engine runs. If the car struggles or dims, the alternator might not be charging well.
What tool do I need to test an alternator?
A digital multimeter is the best tool. It’s cheap, easy to use, and gives an accurate reading.
Will a dead battery affect the test?
Yes. A dead or weak battery can give false results. Charge or replace the battery first before testing the alternator.
Should I disconnect the battery to test the alternator?
No, that’s outdated advice. Disconnecting the battery while the engine runs can damage the electrical system.
Can an auto parts store test my alternator?
Absolutely. Most stores like AutoZone or O’Reilly offer free battery and alternator testing.
How often should I test my alternator?
If your car’s showing electrical issues or if your battery keeps draining, it’s a good idea to test it. Otherwise, once every couple of years is fine.